Friday, December 28, 2018

How to Recover Deleted Messages on Facebook Messenger from iPhone


1: Get Deleted Messages on Facebook Messenger via Search

As the first method for those who wonder how to recover deleted messages on messenger from iPhone, we will be using a built-in option on Messenger app itself. This is a really simple way if you have archived the messages.

Step 1. Launch the Messenger app and go to the recent conversations.

Step 2. Then, go to the search bar located at the top of the screen and look up for the conversation.


2: Retrieve Deleted iPhone Facebook Messages from Contacts

This is another way you can try if you have deleted the conversation from your end.

All you have to do is to contact the person who received the respective message and ask him or her to send it back to you. In this case, you should politely ask your friend (either through a text message or a voice call) to send the deleted message/conversation back as you have accidentally deleted it.


3: Recover Messages on Messenger via Download Settings

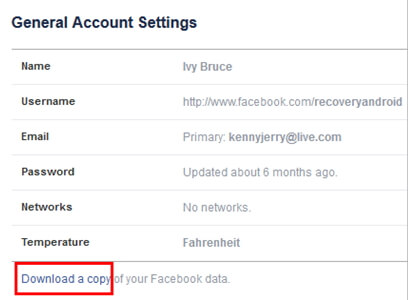
You can use the Download Settings option on Facebook profile to recover Facebook messages. However, if you wonder how to recover permanently deleted messages on Facebook, this method doesn’t work for you. Instead, it allows you to recover archived messages only.

Step 1. Open a web browser and go to your Facebook profile. Select the option labelled “General Account Settings” and go to “Download Copy of Facebook Data”.

Step 2. Click on “Start My Archive” and go to “And More”. Then enter the credentials of your Facebook profile. You will now get an email on your inbox.

Step 3. You can go to the link and open the email. Next you will have to click on the “Download Archive” tab so a zip file will be available with the respective Facebook data.

Step 4. The messages will then be available on your computer. You will now see several html files inside this zip folder. Click on the file that comes with the title “Messages” and have your messages back.


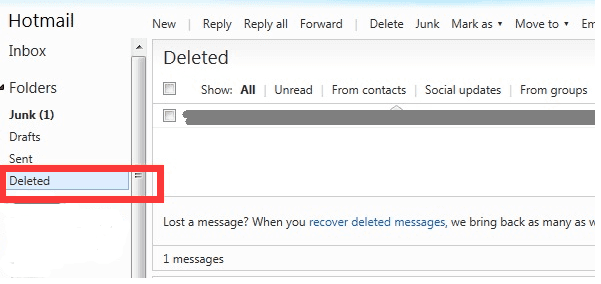
4: View Archived Messages on Facebook Messenger iPhone

This is another option that tells you how to recover deleted messages on Facebook messenger. First, you should know that the hidden messages of your Facebook account sit there in the archives. This method tells you how to recover the archived messages that are actually not erased from your Facebook account.

As the first method, you may try typing your friend’s name (to whom the archived message is sent) in the search box. However, if you need to view the entire archive, you can go to the “Messages” tab and then select “More”. Go to “Archived” option thereafter.

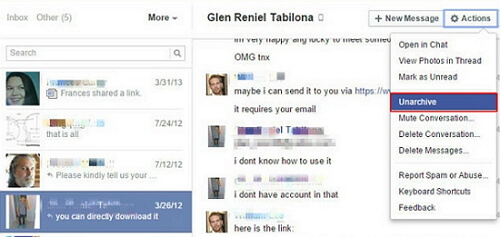
Step 1. To recover the archived messages, you should tap on the “Messages” (as if you are trying to start the conversation).

Step 2. Then, select the name of the friend you had the conversation.

Step 3. You can then find the archived message and click on “Action”. As the final step, you should click on “Unarchive”.Lectura de contenido relacionado:Corrige 0x0 0x0 Error


Bonus Tips:
Restoring Lost Photos and Videos from iPhone

If you have deleted some of your pictures or videos from your gallery, then there is a straightforward way to Recover Deleted Files iPhone back.

After you delete the media files from your gallery, be it photos or videos, then you must know that iOS has a feature that the deleted media files doesn’t get deleted immediately, but it gets compiled to a temporary folder from where it gets deleted after 30 days. If you lost data after you updated to a new iPhone, you can always use Gihosoft iPhone Data Recovery to get the data back from the old iPhone or backup. Should you wish to recover these files, you must go to that “recently deleted” folder and retrieve these files before 30 days.

If you use android phones, please choose Gihosoft Android Data Recovery.

Worth reading:Best youtube downloader online download youtube 1080p

Must Read:

How to transfer messages from iPhone to iPhone

Tips:

How to transfer messages from iPhone to iPhone

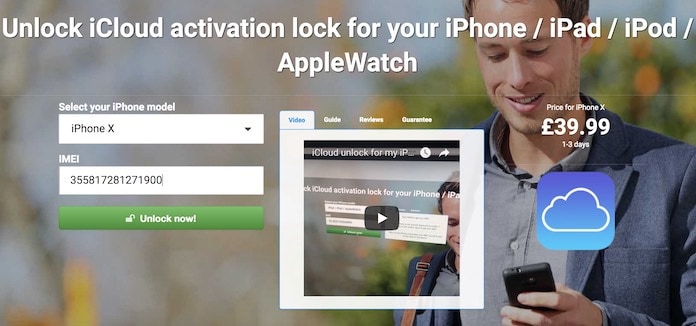
Must read:icloud activation lock removal

Must read:Gihosoft Free iPhone Data Recovery:https://www.gihosoft.com/iphone-data-recovery-free.html

Wednesday, October 10, 2018

How to Use Screen Time in iOS 12 to Set Parental Controls 2019


Apple wants to help them with Screen Time. Let’s see how it works.
1. SCREEN TIME STATS

Launch Settings app and you should see a new option labeled Screen Time. Tap on it to see a detailed report of your usage with different apps by category clusters. By default, these stats reset at midnight. My iPhone's stats show that I spent almost one hour on social media every day on an average.


Tap on the device name to see an app level break down of screen time.


Screen Time will also tell you how many notifications are you getting every day and from which apps. You can then work to curb it.
2. SETTING APP LIMITS

App Limit is a Screen Time feature that will let you set a time limit for different app categories like gaming, social media, entertainment, and so on. Tap on App Limits and then select Add Limit. There is no way to select individual apps here.


Select individual app categories or go for All Apps & Categories to impose a time limit on every app. When you have selected categories, tap on Add on the upper right corner to continue.


You can set a time limit anywhere between 1 minute and 23 hours & 59 minutes. Each day, screen time limit will reset automatically. Just below the time counter, you will see a Customized Days option. You can use it to select days of the week when the limit will apply, or not. Maybe, you can leave the weekends out of the deal?

You can set different time limits for different categories too. Just repeat the whole process again for categories one by one.


As per the screenshot above, that’s one hour of gaming and 30 minutes of social media on my iPhone.

What happens when the time limit is up? The icons of all the apps that have been restricted will fade out with a glass timer icon displaying in front of the app name. If the time limit set in Screen Time expires at the time of using the app, you will be greeted with a warning about the same with an option to increase that limit.


To make sure that the kids are not able to increase this time limit without your permission, Apple has coded a Screen Time Passcode. Go back to Screen Time and scroll to the bottom to find it.


Tap on it to set a 4-digit numerical passcode that is unique. Your young one will now have to request you to increase screen time which you can choose to accept or ignore. Because it is passcode protected, kids can neither change settings nor can they extend their screen time without you knowing about it.


You can increase screen time by 15 mins, 1 hour or approve for the rest of the day. There is no way to enter a custom value.
ALSO ON GUIDING TECH


How to Set Parental Controls in Google Play Store (Complete Guide)

READ MORE
3. FAMILY SHARING

If you have more than one iOS device at your home, you can use the Family Sharing option. This will let you to allow or disallow extra screen time remotely via your own iOS device. You will receive a notification when the kid wants to use the iPhone or iPad beyond the set limit.


You will also receive weekly reports on how much time the kids are spending on different apps and the device itself.
4. DOWNTIME

Downtime will allow you to choose specific times of the day when the device will be locked away for good. You can activate it during meal times, bedtime or when the kid is doing his homework. Two things will happen during downtime.


You will still be able to receive phone calls on iPhone and only those apps that you have allowed will be accessible. All the other apps will be locked.

This brings us to set the apps that are always allowed to open no matter what.
5. ALWAYS ALLOWED

Always Allowed apps, as the name suggests, are those apps that will continue to work whether the screen time is enabled or not. This feature won’t let you put restrictions on an app that is necessary, or the ones that should be accessible any time.


If you have scheduled a Downtime then apps in the Always Allowed category will continue to work as intended. These two features are meant to be used together.
ALSO ON GUIDING TECH


How to Set Parental Controls on Amazon Prime Video

READ MORE
6. CONTENT & PRIVACY RESTRICTIONS

This is an important part of Screen Time. When you enable this setting, you will be able to restrict and control an app as well as in-app purchases remotely from your iPhone or iPad. This will help you to prevent your credit card bill fly through the roof due to accidental purchases.


You can also set Content Restrictions here. Based on the country you are living in, you can restrict video, music, TV, movies, books, web, app, and even Siri content depending on your kids' age. This will help you protect the kids from adult, violent, and hateful content.


There are also some other settings available like the ability to restrict location services, contacts, calendars, and Bluetooth. You can limit volume to a decent level or restrict mobile data if the games can be played offline. Go through it one at a time.
TIME TO TURN OFF THE SCREEN

With the release of Screen Time in iOS 12, Apple has solved two problems at a time. Now parents can now not only monitor what their kids are watching or doing their time on the screen but can also restrict access to certain apps and contents. The ability to do all of this remotely is the only cherry on the cake.

Next up: Do you also own an Android smartphone? Want to learn how to set parental controls in Android. Click on the link below to find out.

Gihosoft Photo Eraser Erase unwanted objects and perfect your amazing photos!

If you lost data after you updated to a new iPhone, you can always use Gihosoft iPhone Data Recovery to get the data back from the old iPhone or backup.

Jihosoft Photo Eraser

Free iTunes/iPhone Backup Extractor for iPhone, iPad

iPhone Backup Extractor - Extract Data from iPhone Backup

You may also like:online youtube downloader

Saturday, September 29, 2018

Trouble Shootings For “iTunes No Sound Windows 10”


Trouble Shootings For “iTunes No Sound Windows 10”

There are a lot of reasons why you may not hear a sound when you connect to iTunes on your Windows 10 PC. However, we are more interested in the solution rather than the problem here; so, it is important to do troubleshooting in order to find and fix the problem. There are 5 tips to take when doing this troubleshooting on your PC and each one of them will be explained in this article.

1 1. Check For iTunes Update on Windows 10: Sometimes, the problem could be as a result of the iTunes on your PC or MacBook being outdated, i.e. an old version. The best thing to do is install the latest version.

2 Update Windows 10 Audio Driver: Basically, you may want to consider the problem could also be as a result of some current settings on your phone or PC. So, in order to make sure everything comes out successful, you could restart your iPhone and PC.

3 Change iTunes Audio Playback Preferences: The USB cable is one other thing to look out for; the cable could be faulty or broken. If your USB cable is in a good state and discoverable by your PC, then you are good to launch iTunes.

4 Computer Audio Settings: There are many times iPhone users make certain settings on their phones without considering the implications; check for restrictions and disable them immediately.

5 Sound Enhancer Conflict: There are many times iPhone users make certain settings on their phones without considering the implications; check for restrictions and disable them immediately.Lectura de contenido relacionado:Corrige 0x0 0x0 Error


Gihosoft Photo Eraser Erase unwanted objects and perfect your amazing photos!

If you lost data after you updated to a new iPhone, you can always use Gihosoft iPhone Data Recovery to get the data back from the old iPhone or backup.

Jihosoft Photo Eraser

Free iTunes/iPhone Backup Extractor for iPhone, iPad

iPhone Backup Extractor - Extract Data from iPhone Backup

Jihosoft Android Data Recovery: the best Android Data Recovery software for Windows and Mac to recover deleted contacts, messages, photos, videos, WhatsApp and etc from Android devices.

Gihosoft Android data recovery Free is a super awesome software specialized in Android file recovery. With this program, you are able to recover deleted photos, music, videos, messages, contacts, call logs, WhatsApp messages, Viber chat history and more from Samsung, Huawei, LG, HTC, Motorola, Google, Oneplus, Sony, Lenovo, ZTE and other Android devices directly.

You may also like:online youtube downloader


Sunday, August 26, 2018

6 Best Cryptocurrency Apps for iOS iPhone and iPad 2019


6 Best Cryptocurrency Apps for iOS iPhone and iPad 2019

Get Best Cryptocurrency Apps for iPhone and iPad. Nowadays plenty of peoples are taking an interest in cryptocurrency as the prices are gradually increasing. For them who had already invested in cryptocurrency like bitcoins are now getting an impressive return. Still, you have the opportunity to involved and invest in cryptocurrency if you want to get a much return in future.Must Read:icloud lock tool

Various digital currencies alternative to bitcoins are available with different market values so you can buy as per your budget. Below I have listed few best cryptocurrency applications, which give you complete information on every digital currency on your palm.

Don’t Miss- How to Recover Deleted SMS/Text Messages on iPhone or iPad
Total Six Best Cryptocurrency Apps for iOS iPhone and iPad


#1. CryptoTrader

It also has EMA and MACD indicators*** If you are looking for the best cryptocurrency advisor, then CryptoTrader is useful for you. CryptoTrader lets you view prices of almost all the digital currencies and also shows previous data which lets you analyze trends and you can determine which currency is best for investment.

It supports major digital currencies like Litecoin, Bitcoin, Ripple, Dash, Monero, Ethereum and many more. Supported by iOS 9 or later.
#2. Blockfolio – Cryptocurrency Apps for iOS

Are you looking for an app which can manage bitcoin and altcoins and maintains all your investments then the Blackfolio is worth using? Get updates when prices of any currency to change and sustain candlestick charge, market details of coins and along with order book.

Track over 2000 digital currencies like Dash, Bitcoin, Litecoin, NEM, Zcash, Ethereum and many more. Black folio is running well with iOS 8.0 or later Devices.
#3. Coin Stats – Cryptocurrency Apps for iOS

Crypto Stats is an incredible app for organizing your crypto data on your palm with updated information about bitcoins and altcoins. Track your earnings and purchase of altcoins with multiple inbuilt functions.

It will allow you to select at least 30 fiat currencies along with you can set a threshold value for price alert. Coin Stats supports more than 1000 digital currencies and multiple languages like German, Japanese, Chinese and much more. Supported by iOS 9 or later devices.
#4. Crypto-Pro for iOS

Crypto-Pro provides information about altcoins and bitcoins of over 1000+ digital currencies and tokens with alerts and portfolio. Calculator for currency conversion makes easy to convert currency, and you can customize your favorite coins.

It consists of multiple exchanges like Gemini, Coinbase, GDAX, Bitsquare and much more. This is also a best CryptoCurrency App for Apple Watch. Smoothly running with an iOS 10 or later

Don't Miss - Best iCloud Lock Removal Tool for iPhone/iPad

#5. Coin Cap– Cryptocurrency Apps for iOS

When you want to calculate the real-time value in the fiat currency of your choice, then you should go for this app. Remain up to date through daily or weekly updates regarding prices or altcoins and bitcoins.

Through the app, you can share information of prices via email or messages or on social media directly. To maintain privacy, it has touch ID and password facility.
#6. CoinFolio – Good Cryptocurrency App

Get past 24hours values and also before 7day costs in percentage along with a calculator to convert coins into your local currency. Simply designed with an attractive background and easy operating format so that one who is new to this can also use this app and get notified of updates.

The personal data of yours is stored in your local store, and it supports over 1000 crypto coins.

If you lost any data on iPhone, feel free to try Gihosoft iPhone Data Recovery.

Free iTunes/iPhone Backup Extractor for iPhone, iPad

Jihosoft iTunes Backup Extractor is a powerful tool to recover and extract important data from iPhone, iPad & iPod touch backup on Windows or Mac.

Any suggestion or recommendation will be appreciated in the comments below.

Wednesday, August 22, 2018

How to Turn Off Live Photos on iOS 12?


Part 1: How to Turn Off Live Photos on iOS 12?

Turning off Live photos on iOS 12 is super easy, just in a few steps you can do it on your own. You can turn Live photos off:
1 In Camera App


Open Camera App in your iPhone and wait for the screen to be ready for capturing shots.


If PHOTO is not selected by default, move the bottom menu and make the selection to PHOTO.


Look for the yellow dots forming a circle-like image at the top-center of the screen.


Tap the yellow dots (circle). You will see a Power sign accompanied with the message 'LIVE OFF'.


While you can easily turn the Live photos as 'off' using the above steps, for your ease, we have listed another way that can help you to do that.
2 In Settings


Open Settings.


Scroll down to the bottom to find the Camera option. Make sure you do not enter the General option.


Tap Preserve Settings and look for the Live Photo option at the bottom.


Switch Live Photo options as off.


Extra tips: While you can switch off the Live photo option using the above-mentioned steps, we recommend you to keep enjoying the feature and make use of TunesMate to settle the storage issues for you.
For now, check:Free iTunes/iPhone Backup Extractor for iPhone, iPad
Jihosoft iTunes Backup Extractor free is a powerful tool to recover and extract important data from iPhone, iPad & iPod touch backup on Windows or Mac.
Jihosoft Android Data Recovery: the best Android Data Recovery software for Windows and Mac to recover deleted contacts, messages, photos, videos, WhatsApp and etc from Android devices.
Gihosoft Android data recovery Free is a super awesome software specialized in Android file recovery. With this program, you are able to recover deleted photos, music, videos, messages, contacts, call logs, WhatsApp messages, Viber chat history and more from Samsung, Huawei, LG, HTC, Motorola, Google, Oneplus, Sony, Lenovo, ZTE and other Android devices directly. Meanwhile, this Android data recovery software is available for both Windows and Mac platforms.
If you can’t sync with iTunes and want to rescue data from a disable iPhone, you could try Gihosoft iPhone Data Recovery. Also feel free to ask questions on the iDevice is disabled error in the comments section below.


Sunday, August 12, 2018

How to Charge iPhone & iPad Faster


How to Charge iPhone & iPad Faster

This is just great! Now charge your iPhone X /8 /7 /7 Plus/ 6S/ 6 Plus, iPad Pro Air/ Mini and other tablets twice as fast than normal USB chargers and save your time.


iClever BoostCube 4.8A 24W USB Wall Charger is the best selling product which has over 12000 reviews on Amazon. This product has dual ports that mean you can charge two devices at the same time. The great thing about this wall charger is it can detect any device which will then charge devices at fast speed while controlling the voltage.


Check out product feature on Amazon


SMART ID TECHNOLOGY: It can recognize any device, and maximize the charging efficiency. It charges your phone twice as fast and saves you time!


POWERFUL CAPACITY WITH DOUBLE CHARGING: Our 2 USB ports have 24W/4.8A power, and allows you to charge two devices simultaneously, at top speed!


CHARGES ALL MODELS OF PHONES AND TABLETS: It’s suitable with electronic devices and models, from iPhones, Samsungs, HTC Nexus, Blackberries, Bluetooth Speaker Headsets to iPads and Power Banks.


PORTABLE AND SAFE DESIGN: It’s small and lightweight, compact and easily portable, perfect for traveling. It contains internal protection mechanisms, and a hidden blue LED power indicator to let you know when your phone is charging.


LIFETIME SUPPORT GUARANTEE: Our friendly and reliable customer service will respond to you within 24 hours! You can purchase with confidence, with our 18-month replacement warranty, or 30 days money back guarantee and of course our lifetime support guarantee!

Compatibility


Apple iPhone 7, Se, 6s, 6s Plus, 6 Plus, 5, 5C, 5S, iPad Pro/Mini/Air


Samsung Galaxy S7, S6 Edge, S6, S5, S4, S3, Note 5 4, Tab(at 5V/2A)


HTC One 10 A9 X V S M9 M8,LG G5, Optimus F3,Nexus 5 6 7 9 10, Motorola Droid RAZR MAXX(at 5V/1.5A)


Blackberry, Kindle (Fire) and more! (at 5V/1A)

Buy on Amazon

You may also like:

Gihosoft Free Android Data Recovery can help you easily recover lost data such as photos, videos, contacts, text messages, WhatsApp & Viber chats from Google Pixel/XL or other Android phones effortlessly.


If you lost videos from iOS Camerall Roll which are nowhere to download again, you can use Gihosoft iPhone Data Recovery to get back deleted videos from iOS device including iPhone, iPad and iPod Touch.

Any app suggestions or topic recommendations are appreciated in the comments down below.


Friday, August 10, 2018

Top 3 Methods to Delete Snapchat Account on iPhone/iPad 2019


Top 3 Methods to Delete Snapchat Account on iPhone/iPad

Following are some methods to delete Snapchat account on iPhone/iPad and even Android devices:
#1 Delete Snapchat Account from Web Browser

The entire Snapchat account deletion process can be done on any web browser on your iPhone or computer. You can use Safari, Chrome, Firefox, or any other web browser of your choice. The process is quite simple. Follow these instructions:

Step 1. Open the web browser of your choice on your iPhone.

Step 2. Visit https://support.snapchat.com/delete-account.

Step 3. Login using your Snapchat username and password.

Step 4. Check the box for human verification and then click the SIGN IN button.


Step 5. You will need to enter your username and password again after the above step.

Step 6. Click on Delete Account.

Once you have successfully performed the above mentioned steps, your Snapchat account will be deactivated. You won’t be able to log in to Snapchat and your friends will no longer be able to send you snaps. Snapchat will also send you a confirmation email regarding your account deactivation.
#2 Delete Snapchat Account from Snapchat App

You can delete your Snapchat account from the Snapchat app as well. The process is somewhat similar to deleting Snapchat account via web browser. Follow these instructions:

Step 1. Open Snapchat app on your iPhone.

Step 2. Navigate to the main menu by swiping down on your screen and using the camera page.

Step 3. Now open settings via the gear icon located in the top right corner.


Step 4. In the settings section, navigate to Support > My Account & Settings and then find and tap Account Information.

Step 5. Now select Delete My Account option. The option will be available on top of the word ‘Page’.

Step 6. You will need to enter your password in order to verify the account deactivation.

Step 7. Tap Continue. You will be notified on the next page about your account deactivation. The account will stay deactivated for the next 30 days, during that period you can reactivate it but not afterwards.
# 3 How to Delete Snapchat Account on iPhone Permanently?

In order to delete your Snapchat account permanently, you will need to first use one of the methods mentioned above to deactivate your account. Once you have successfully deactivated your Snapchat account, all you need to do is wait for 30 days. After that period, your account will be permanently deleted. It is simple as that. The key is to not reactivate your Snapchat account within the given 30-day period. If you want to confirm that your account has been permanently deleted, you can try to log in using your old username and password. If your account has been permanently deleted, then you won’t be able to log in.


Bonus Tips on Snapchat Account & Messages Management
1 Delete Snapchat Messages on iPhone

There are two ways to delete Snapchat messages on iPhone:
Delete Saved Snapchat Messages

You can save your Snapchat messages. It can be done by long pressing the chat/text that you want to save. Saved messages are highlighted in grey color and shown in bold text. Follow these instructions to delete saved messages on Snapchat:


You simply need to unsave/un-highlight the saved messages. To do that, tap and hold the saved message and wait for it to be un-highlighted.


Exit the chat. The message will be automatically deleted the next time you enter the chat.
Clear Conversations

There is another quick way to delete your chats on Snapchat. It is called Clear Conversations. Follow these instructions to clear your Snapchat conversations:


In Snapchat app, navigate to Settings > Clear Conversations.


Now choose the conversation that you want to delete.


Note

If the message is not deleted, then it means it has been saved by the other contact. So to delete the message, you will have to ask the other contact to unsave it on their end. Once the other contact unsaves it, you can perform the above mentioned method to delete the chat.

Gihosoft Total Video Converter is a professional all-in-one video tool that enables you to convert videos and audios into various different formats. You can also download videos from YouTube or other online video sharing sites and convert them easily. Plus, you’re able to personalize your videos with its inbuilt editor, such as, trimming, cropping, applying video effects, adding watermark, subtitles, and more. If you need a powerful and professional desktop video converter program, just download Total Video Converter and follow the step-by-step guide here to have a try.


Jihosoft Android Data Recovery: the best Android Data Recovery software for Windows and Mac to recover deleted contacts, messages, photos, videos, WhatsApp and etc from Android devices.


Gihosoft Free Android Data Recovery can help you easily recover lost data such as photos, videos, contacts, text messages, WhatsApp & Viber chats from Google Pixel/XL or other Android phones effortlessly.


If you lost videos from iOS Camerall Roll which are nowhere to download again, you can use Gihosoft iPhone Data Recovery to get back deleted videos from iOS device including iPhone, iPad and iPod Touch.


Any app suggestions or topic recommendations are appreciated in the comments down below.

Wednesday, August 8, 2018

[Fixed] “iPhone Not Backed Up” Keeps Showing


[Fixed] “iPhone Not Backed Up” Keeps Showing

You receive a notification on your iPhone stating that your device isn’t backed up and you want to get rid of it. You get reminded about it almost every day. In this post, we explain what “iPhone Not Backed Up” message implies as well as what steps you can take to eliminate it.


Meaning of “iPhone Not Backed Up” Message

The message “iPhone Not Backed Up” implies that you haven’t backed up your data to iCloud since long. iCloud backups are created anytime when the device is locked, connected to power or engaged in a WiFi connection. The notification that your iPhone isn’t backing up displays on the screen usually when you’re run out of space to store contents on iCloud.

Below we discuss how to remove “iPhone Not Backed Up” message and how to use iTunes & iCloud to backup your handset’s contents.
Removing the Annoying iPhone Not Backed Up Message

There are some ways to take out the “iPhone Not Backed Up” message completely. Firstly, you can do an iCloud backup. There’s an excellent article on Unlockboot explaining how to backup iPhone to iCloud. If you run into issues, feel free to reach out to us and we’ll help you perform a backup.

Another thing you can try is to launch Settings > tap “iPhone Not Backed Up” message, and tap “OK”, This is a temporary way to remove the message, but the notification comes back sooner or later. It mostly appears the next time the iPhone’s screen is locked.


If you don’t want to create a backup and want the message to go away permanently, launch Settings, tap your name on the screen’s top, tap “iCloud” and then “iCloud Backup” and switch off the toggle besides iCloud Backup. Lastly, tap OK when the prompt for confirmation shows on the screen.


When you switch off iCloud Backup, the iPhone will only create backups when it is connected to a Mac or PC and iTunes is available. If you didn’t backup already, we suggest you to create one now. You don’t want to be the one who loses all their precious data because of a malfunction.
End of “iPhone Not Backed Up” Message

You’ve finally eliminated that irritating “iPhone Not Backed Up” notification and hopefully created a backup for your device as well. ICloud is powerful not only on backup but also restoring. If you accidentally lost important data like messages on iPhone, you can use Gihosoft iPhone Data Recovery to recover messages only from iCloud backup or even without backup.


Any app suggestions or topic recommendations are appreciated in the comments down below.

Monday, August 6, 2018

Download iOS 12 Beta 6 without developer account


Download iOS 12 Beta 6 without developer account

WHAT’S NEW IN IOS 12 BETA 6?

iOS 12 Developer Beta 6 weighs around 450MB on all compatible devices and brings some new features and improvements. This version fixes the following bugs that were present in the previous beta updates –


Paired Bluetooth accessories may not function correctly after a reboot.


Using Apple Pay Cash to send or request feature may lead to an error.


Siri can’t open an application by name on CarPlay.


Some Siri shortcuts requests may not succeed.


Apart from performance improvements and bug fixes, beta 6 also brings some new features. Apple has beefed up the USB security considerably in this update. You may need to unlock your passcode-protected device before you connect it to a computer or USB accessory.

If you are a registered developer, you can download this update straight from the Apple Developer Center. Alternatively, you can use the download links below to download its OTA Profile (on-device update) or IPSW file (for iTunes).


DOWNLOAD IOS 12 BETA 6 OTA/IPSW
OTA PROFILE


Download
IPHONE


iPhone SE, iPhone 5s


iPhone 6s, iPhone 6


iPhone 6s Plus, iPhone 6 Plus


iPhone 8, iPhone 7


iPhone 8 Plus, iPhone 7 Plus


iPhone X
IPAD


iPad Air, iPad mini 2


iPad mini 4, iPad Air 2, iPad mini 3


iPad (5th generation), iPad (6th generation)


iPad Pro (9.7‑inch)


iPad Pro (12.9‑inch)


iPad Pro (10.5-inch), iPad Pro (12.9-inch) (2nd generation)
IPOD


iPod touch (6th generation)
SHOULD YOU UPGRADE?

If you are currently running the fifth beta version of iOS 12 and are affected by any of the aforementioned bugs, you should update your device. All in all, it’s a minor update and you won’t miss out on anything if you give it a pass.

Sponsor Ads:

Gihosoft Free iPhone Data Recovery is a professional iPhone Data Recovery software to get back all your lost text message, photo, video, call history, note, contact and more from iPhone/iPad/iPod Touch. It offers a full solution to recover your lost data in different tough situations. Besides recovering data directly from iPhone, iPad and iPod touch, it also allows you to recover data from iCloud and iTunes backup files.

iPhone backup unlocker:Recover iTunes Backup Password.

Photo recovery free photo recovery 100% free to restore deleted/formatted/lost pictures in just three steps Photo recovery,free photo recovery software https://www.gihosoft.com/free-photo-recovery.html

Any app suggestions or topic recommendations are appreciated in the comments down below.

Sunday, August 5, 2018

Steps for Completely Bypass iOS 12 iCloud Activation Lock


Steps for Completely Bypass iOS 12 iCloud Activation Lock


Head to “Applications” choice and choose “Crash Test 1” to reprise things.


Go to WiFi Settings and choose “I” and then choose “Manual” over the “HTTP proxy” zone.


Now list 30 distinct emoji icons to “server” and enter “8888” over “port” zone.


Select “Back” and “Next,” and perform slide to unlock. Next, select “languages.” Don’t just click, rather click frequently for a few minutes so that it boots over the screen.


When the home screen comes up, you’ll see three options: Newsstand, FaceTime, and Phone.


Hold the Power and Home button each time you start an app to respring iPhone and facilitate the process.


Now navigate FaceTime, where the last owner’s mail would be. Feel free to contact that person and ask if you can take off the device from iCloud. If you can’t find the mail, continue with bypass Activation Lock steps and browse the iPhone Phone app to see if the contact information of the relevant owner is available.
Bypass iCloud Activation iOS 12 – iCloud Unlock & Removal

If you fail to get the job done using the above mentioned steps, you can always use a company that specializes in the removal, unlock, or bypass iCloud Activation Lock in iOS 12. We suggest the following ones.
UnlockBoot iCloud Removal & Unlock Services

They’re one of the best you’ll ever find. We say this because they can unlock almost every iPhone model. What’s incredible is that they provide the unlock in just a day or two. Their customer support is also great, and most queries are answered within an hour. Price is also the same as other leading companies – $99 for an unlock.


It is also a EU-based firm, so the customers get charged in US dollars. However, the international company offers service globally and takes payments in all currencies (conversion fee is applicable).
iCloud Bypass & Removal from Official iPhone Unlock

Perhaps you’re already familiar with this name. They can unlock several iOS devices, except older ones like iPhone 3GS. They just need 2-5 days to provide unlock, and have top-notch customer support. You can use their services by going to this link.


$59 is the price for the unlock, but it’s a different payment structure. Customers have to pay $19 upfront, and the rest of the $40 is paid after the unlock is finished. The company operates globally and accepts several forms of payment including credit cards.
Unlock iCloud Locked Devices Using iPhone IMEI Website

The last pick on the list. However, they’re sadly no longer providing iCloud removals. Also, they’ve been struggling to unlock most iCloud-related accounts. Those who’ve already taken this option are aware of this company’s struggles. You may also find it difficult to receive refunds.


We hope this bypass iCloud Activation Lock iOS 12 post turns out helpful. Please share it with your family and friends who own an iDevice as they may have updated to iOS 12 and are searching for an iCloud removal. Social shares are also a big motivator for us. We’d continue writing extensively on the little (and big issues that iPhone users go through on a daily basis. If you lost videos from iOS Camerall Roll which are nowhere to download again, you can use Gihosoft iPhone Data Recovery to get back deleted videos from iOS device including iPhone, iPad and iPod Touch.

Jihosoft iPhone Backup Extractor Extract and recover all types of data from iPhone backup files, such as camera roll photos, videos, SMS, contacts, reminders, WhatsApp, and etc.

Thanks for your time.


Friday, August 3, 2018

Recover Deleted Emails: Gmail/Outlook/Hotmail/Yahoo Mail


How to Recover Deleted Emails from Gmail/Outlook/Hotmail/Yahoo

Recover Deleted Emails: Gmail/Outlook/Hotmail/Yahoo Mail

Most people use Gmail, Outlook, Hotmail, and Yahoo mail messages to send and receive emails. These email programs are designed to help users communicate through email with ease and convenience. Each email program has its advantages and disadvantages depending on the user’s preferences. However, when it comes to recovering deleted emails, each email application has its own unique way of how to recover deleted emails. We are going to help you learn how to recover deleted emails from Gmail, Outlook, Yahoo Mail, and Hotmail.
recover deleted emails

- 1 - Recover Deleted Emails from Gmail

Gmail is one of the most preferred email application across the globe. This is because of the many benefits it has and how user-friendly it is. If you are using Gmail as your default email program, you can easily recover your deleted emails using the following steps:
Step 1: Open your Gmail account and then log in to the account. Click on Settings, and then click on Labels  
Step 2: Tap on Show Trash. The trash folder will be opened and you will be able to see all the deleted emails in the folder.
Step 3: Select the emails you want to recover and then click on the Move to mail icon found at the top part of the Gmail window.
Step 4: Scroll down to find Inbox among the options available and then click on the Inbox option. This will move the selected files from the trash to the inbox folder. Open your inbox folder and you will find them there.
recover deleted emails

- 2 - Recover Deleted Emails from Outlook

Some people prefer Outlook to other email programs. If this is your preferred email program and you want to learn how to recover deleted emails, you can use the following steps:
Step 1: After you have signed in to your account, select the Deleted Items folder in the Outlook.com window.
Step 2: Click on Recover Deleted Items found at the top of the Outlook window.
recover deleted emails
Step 3: A box will appear with a list of deleted files.
Step 4: Select the emails you wish to recover and then tap on Recover Selected Items.
recover deleted emails

- 3 - Recover Deleted Emails from Hotmail

Hotmail offers a variety of benefits to its users and it is among the most preferred email programs by many people across the world. If this is your email program of choice, here are steps on how to recover deleted emails:
Step 1: Sign in to your Hotmail account.
Step 2: Click on the Deleted folder located in the left panel of the Hotmail window.
recover deleted emails
Step 3: Tap on Recover deleted messages. This will retrieve the deleted emails.
recover deleted emails

- 4 - Recover Deleted Emails from Yahoo

Yahoo mail is still one of the largest email programs in the world. With thousands of users using this email service, it is arguably still popular among email users. Here are steps on how to recover deleted emails from yahoo mail:
Step 1: Sign in to your Yahoo mail account and locate the Trash folder and open it.
Step 2: Click on the deleted email and select the messages you wish to retrieve.
Step 3: Click on Move option in the Yahoo mail toolbar and choose Inbox. Go to your Inbox to find the email there.
Step 4: Alternatively, drag and drop the email from the Trash folder to any other folder by simply pressing DO.
recover deleted emails

If you have accidentally deleted your emails, worry not because it is not permanently deleted from your email program. Simply use the above ways on how to recover deleted emails and get back that important email.
Sponsor Ads:
Gihosoft Free iPhone Data Recovery is a professional iPhone Data Recovery software to get back all your lost text message, photo, video, call history, note, contact and more from iPhone/iPad/iPod Touch. It offers a full solution to recover your lost data in different tough situations. Besides recovering data directly from iPhone, iPad and iPod touch, it also allows you to recover data from iCloud and iTunes backup files.
iPhone backup unlocker:Recover iTunes Backup Password.
iPhone backup extractor free:The best iPhone Backup Extractor software to extract photos, text messages, contacts, voice memos, note, WhatsApp, Viber and etc from iPhone/iPad backup.
Comment and win free lifetime registration code of Gihosoft Total Video Converter.
Youtube/Tumblr video downloader - Download Youtube/Tumblr video lets you convert and download Youtube/Tumblr to MP4 and MP3 for Free!

How to Manually Backup and Restore Camera App Settings in Windows 10

  How to Manually Backup and Restore Camera App Settings in Windows 10 Here are the steps to manually backup and restore Camera App settings...